- Beauty&Health

- Beauty tutorials
Step-by-Step Guide to Tying a Necktie
Although casual attire is becoming more common, knowing how to tie a tie is still a must for those special occasions that call for dressing up—or if you just want to rock a tie yourself. The good news? Learning how to tie a tie is easier than it may seem! Whether you’re looking for how to tie a tie easily or want to master a more intricate knot, we’ve got you covered. Check out our guide to tying a classic tie knot, plus tips on how to tie a bow tie and some creative necktie knots to add a stylish touch to any outfit.
RELATED: How to Dress Perfectly for Any Occasion
What You'll Need
Equipment / Tools
- Tie bar (optional)
Materials
- Tie or bow tie
How to Tie a Necktie

STEP 1: Put the necktie over your neck.
Lay the tie around your neck with your collar upturned so that the middle of the tie is seam down and flush with the back of your collar. Keep the small end in your other hand and the wide end in your dominant hand. Reduce the wide end until the tip is approximately one foot below the narrow end.
STEP 2: Over the narrow end, cross the wide end.
Holding it a few inches below your neck where they meet, cross the broad end over the narrow end.
STEP 3: Place the broad end beneath the narrow end.
Pull the wide end back toward your dominant side by reaching beneath the narrow end with your dominant hand and grabbing it.
STEP 4: Drag the broad end through the middle.
Where the knot is starting to form, bring the broad end over the front. Next, move it up through the loop between your neck and the tie by switching hands. Pull it through the narrow end all the way.
STEP 5: Through the knot, loop the broad end.
Starting at the point, make a tiny loop inside the knot and push the wide end through it.
STEP 6: Make the knot tighter.
Using your non-dominant hand, gently squeeze the knot while using your other hand to pull the thin end. Pull the knot up until it comes into contact with the front of your collar. While the narrow end stays buried, the wide end's tip should strike the top of your belt buckle. Lastly, lower your collar.
How to Tie a Bow Tie
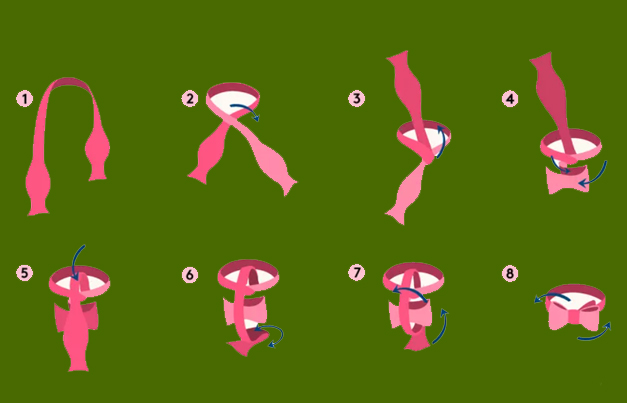
STEP 1: Put the bow tie in place.
One side of the bow tie should be longer than the other when you first drape it over your neck. On your right side, the longer end should hang around 1.5 inches below the shorter end.
STEP 2: Go Over the Longer End Above the Shorter End
At the intersection of your collar, fold the longer end over the shorter end. Using one hand, hold the crossed ends in place.
STEP 3: Create the Bow Shape
Create a basic loop by folding the bow tie's shorter end up toward your neck with your dominant hand. The "bow" portion of the knot is this loop.
STEP 4: Encircle the bow with the longer end.
Wrap the longer end of the bow tie behind the loop that has been folded. Pull the longer side's end around to the front and hold it in place.
STEP 5: Tuck the Longer End in Going Through the Loop
The shorter part of the bow will be folded to create a tiny pocket at the front. Pull the longer end slightly to tighten it after tucking it through this pocket.
STEP 6: The bow tie should be adjusted.
To make sure the bow tie is even and centered, carefully tug on both loops. Both ends of the bow tie should be symmetrical, and the bow should fit snugly against your collar.
Different Ways to Tie a Necktie
Neckties can be tied in a variety of ways, each with its own distinct style. Here are some ideas to improve your ensemble, whether you like a straightforward, traditional knot or something striking and fashionable:
1. The Knot on Four Hands
A classic knot that is simple to learn and appropriate for almost any situation. It is ideal for semi-formal to informal occasions and produces a somewhat asymmetrical appearance. It's an excellent choice for novices.
2. The whole Windsor knot
This knot is perfect for dressier events because it creates a broad, triangular shape. It gives people more rigidity and balance, especially those with wider shoulders. This is a fantastic option for business meetings, interviews, and formal occasions.
3. The Windsor Knot Half
Even though this knot is smaller than the Full Windsor, it nevertheless looks sophisticated and polished. It works well in most situations, including weddings and the workplace, and it's a little simpler to knot.
4. The Kelvin knot
Wider ties work well with this elegant and structural knot. It produces a polished and well-balanced appearance, which makes it a great option for people who like a tidy appearance.
5. The Pratt Knot
This medium-sized knot, which is also called the Shelby Knot, is simple to make and looks fantastic on taller people. It provides a crisp, polished look and works well with the majority of tie fabrics.
6. The Trinity Knot
Three separate loops at the front give this striking knot a distinctive layered appearance. For people who wish to make a statement at formal events or special parties, it's a chic choice.
7. The Eldredge Knot
an elaborate knot that resembles a braided pattern. Although it takes time and accuracy to master, this knot is ideal for creating a statement. To accentuate the detail, it looks best with a tie of a solid color.
Finding a knot that fits your event and personal taste is simple because each one has its unique charm. To discover your ideal match, try experimenting with different knots!
1. Select the Proper Length of the Tie
When standing, your tie should finish at the center of your belt or waistband. If you're above six feet tall, you might want to get a longer tie. To get the ideal length, you would also need to try out several knot techniques.
2. Select an Adorable Tie Width
While a bigger tie suits people with a wider physique, a slender tie tends to go well with slimmer body types. A balanced and fashionable appearance is ensured by selecting the appropriate width.
3. For a polished appearance, make a dimple.
Just behind the knot, add a dimple for an additional sophisticated touch. Tighten the tie while keeping the indentation in place by putting your index finger under the knot while it is still loose.
4. For Correct Positioning, Use a Tie Bar
A tie bar can help you change the length of your tie and keeps it in place. If your tie is overly long, tuck the extra material between your shirt's third and fourth buttons, beneath the tie bar. This guarantees both fashion and mobility.
5. Examine the Shape of Your Collar
Certain tie knots work best with different collar shapes:
- Choose narrower knots, such as the Four-in-Hand, for narrow collars.
- Wider collars: To keep balance and proportion, use bigger knots like the Pratt Knot or Full Windsor.
6. Examine the Texture of the Fabric
The effectiveness of some knots depends on the tie's material:
- Avoid intricate knots on thicker materials (such as knitted ties or wool) to avoid adding too much bulk.
- Lighter materials (like silk): More elaborate knots can improve the style without needlessly increasing the weight.